Welcome to Chopper Pilot Vietnam!
You are the Aircraft Commander of a UH-1 Huey in Vietnam.
This guided tutorial walks you through Mission 101, your first mission in the Primary Campaign. You will fly a single Huey on a resupply mission, move across the Operations Map, enter the Tactical Map, deal with enemy contact, land at the LZ, unload supplies, and return to base.
You are not learning every rule yet, just the basic mission loop which consists of a mission briefing, setup, flight route, tactical entry, combat, landing, exit, return, and post-mission procedures. If you have a copy of the game already, you can follow along using the charts and tables referenced below. If you do not have a copy you will still find this tutorial useful.
Section 1: Read Mission 101
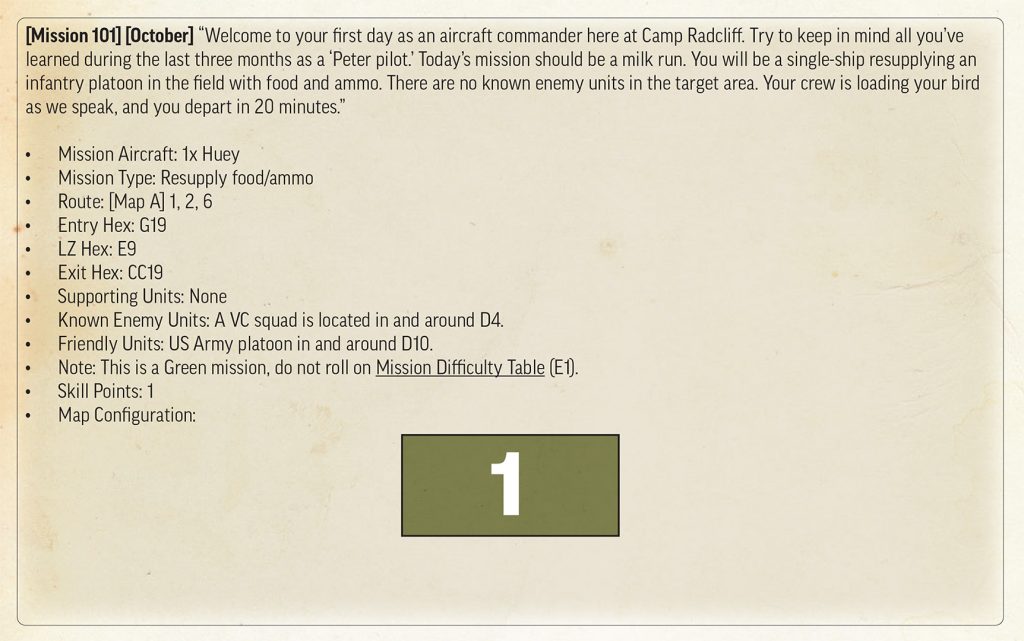
You are flying a single UH-1 Huey on a resupply mission. Your job is to deliver food and ammunition to a U.S. Army platoon in the field.
The Mission Briefing gives you everything needed to set up the mission: aircraft, mission type, route, entry hex, LZ hex, exit hex, supporting units, known enemy units, friendly units, and the Skill Point award.
For Mission 101, note the key details:
Aircraft: 1x Huey
Mission Type: Resupply food/ammo
Route: Operations [Map A] 1, 2, 6
Entry Hex: G19
LZ Hex: E9
Exit Hex: CC19
Supporting Units: None
Known Enemy Units: VC squad in and around D4
Friendly Units: U.S. Army platoon in and around D10
Mission Difficulty: Green mission; do not roll on Mission Difficulty Table E1
Skill Points: 1
Section 2: Pull the Components
For Mission 101, pull only the components you need. Do not empty the box.
You need:
- One UH-1 Huey Helicopter Info Card
- One Huey counter
- One Crew Board
- Crew Bio Cards or selected crew members
- Mission Log
- Operations Map A
- Tactical Map 1
- Flight Counter
- U.S. Army platoon counters (1x HQ unit, 9x Fireteams)
- VC squad counters (3x Fireteams)
- Suppression and Unspotted markers
- Enroute Event deck
- Combat Event deck
- Return Event deck
- All player aids (charts & tables)
- Dice
This first mission uses one Huey, no Cobras, no Loach, no air strikes, and no artillery. Keep the table clean.
Section 3: Set Up Your Crew
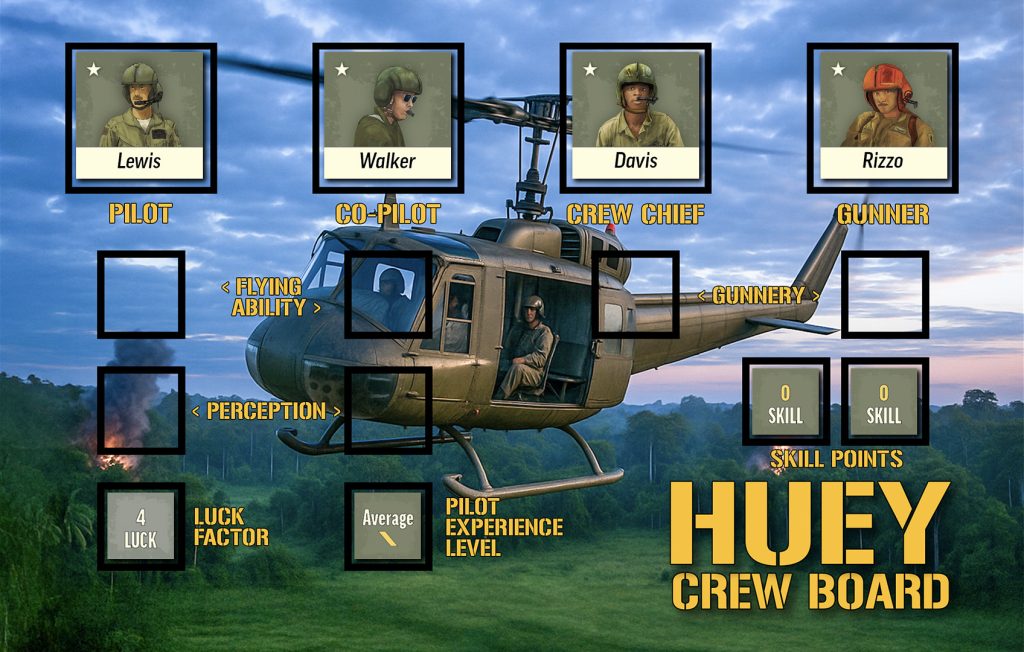
For this tutorial, do not worry about optimizing your crew. Pick any available starting crew, then place each crew member in the correct space on the Crew Board.
Your Huey has four crew positions:
- Pilot
- Co-pilot
- Crew Chief
- Gunner
Your pilot and co-pilot have Flying Ability and Perception skills. Your crew chief and gunner will only have the Gunnery skill.
Skills start at 0 and can be increased through the expenditure of Skill Points that you will earn by completing missions. Mission 101 is worth 1 Skill Point. Some Crew Bio Cards list a starting skill level of 1.
Now roll 1D10 for your pilot’s Luck Factor. For this tutorial example, the pilot rolled a “4” for Luck Factor. Record the result on the Crew Board. Luck Factor may be used later to influence certain die rolls, but this tutorial will tell you when it matters.
Teaching Point: The Huey is not just a helicopter counter. It has a crew, and each crew member has a role. As the campaign continues, their skills and survival will matter.
Section 4: Fill Out the Mission Log
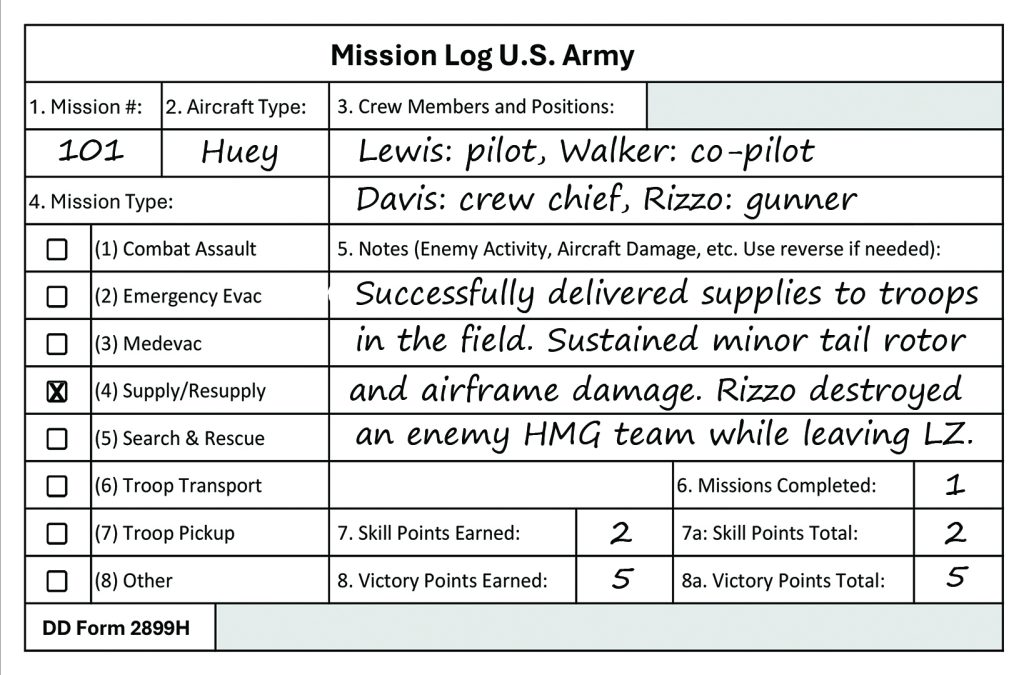
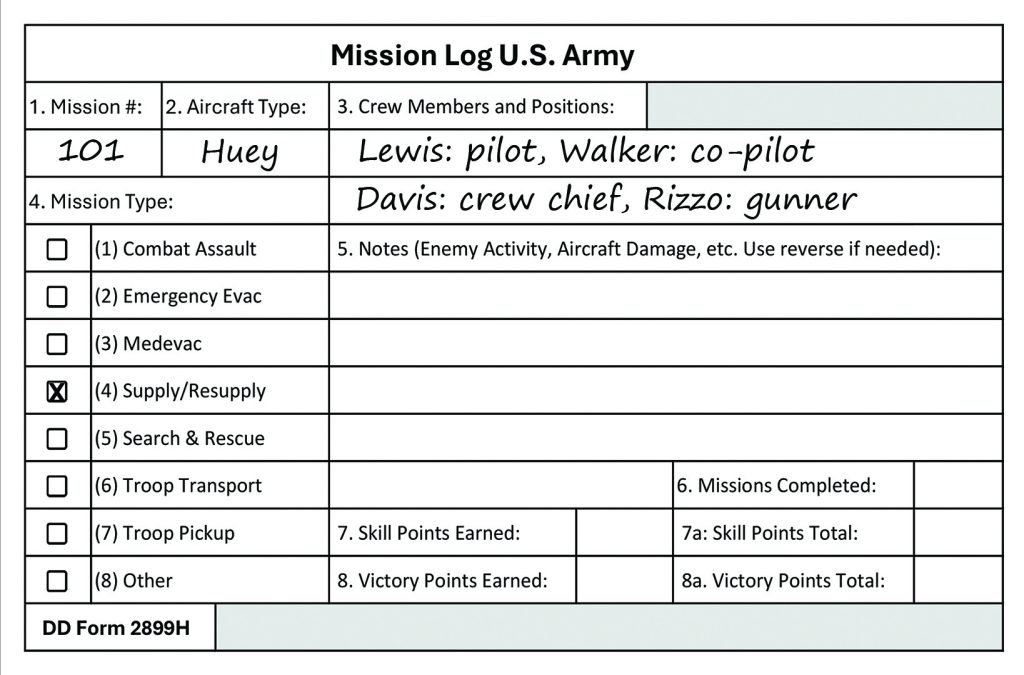
Now fill out the Mission Log for Mission 101.
Record the following information:
- Mission #: 101
- Aircraft Type: Huey
- Crew Members and Positions: Write in the crew members you selected in Section 3
- Mission Type: Supply/Resupply
Do not fill in Skill Points, Victory Points, Missions Completed, or mission totals yet. Those are recorded after the mission is completed.
The Notes section can be used during play to record enemy activity, aircraft damage, crew wounds, unusual events, or anything else you want to remember.
Teaching Point:
The Mission Log is your campaign record. It tracks what mission you flew, who flew it, what type of mission it was, and what happened during play. Even in a simple tutorial mission, get into the habit of filling it out before takeoff.
Section 5: Set Up the Operations Map
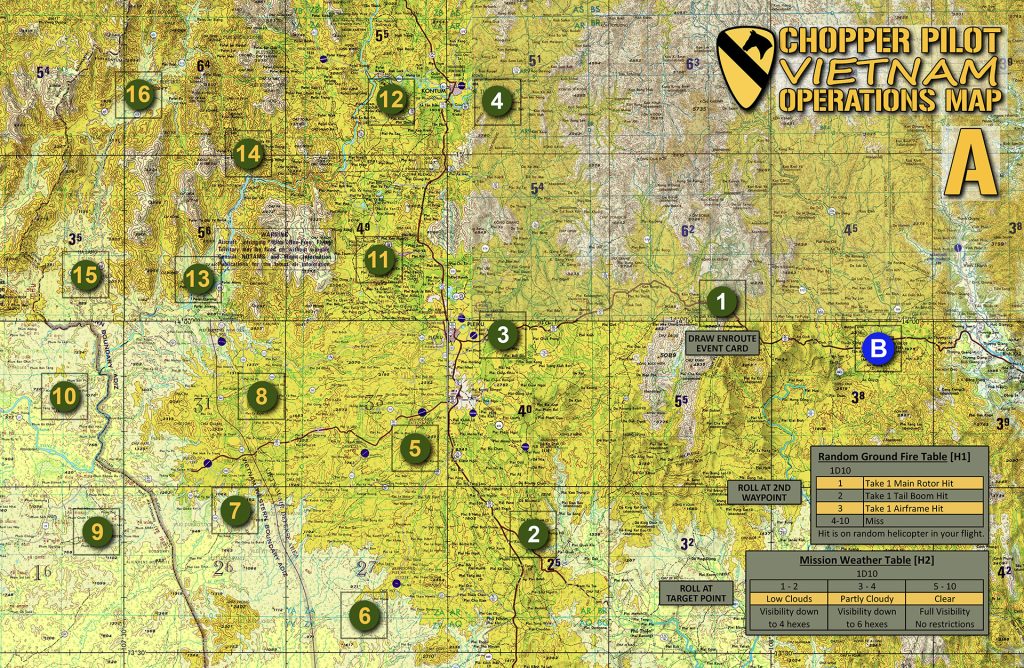
Place Operations Map A on the table.
Find the Base point marked “B” and place the Flight Counter there. The Flight Counter represents your Huey while you are flying on the Operations Map.
Do not place the Huey counter on the Operations Map. The individual helicopter counter will be used later, when you enter the Tactical Map.
Mission 101 uses the following route:
- Start at Base
- Fly to Waypoint 1
- Fly to Waypoint 2
- Fly to Target Point 6
Keep the Enroute Event deck and Return Event deck nearby. You will need them during the Operations Map portion of the mission.
No Movement Points are spent on the Operations Map. You move from waypoint to waypoint as listed in the Mission Briefing.
Altitude is not tracked on the Operations Map. Altitude will matter later, once the Huey enters the Tactical Map.
Teaching Point:
The Operations Map handles the flight to and from the mission area. It is not tactical movement. You are following the mission route, checking for events, ground fire, and weather before entering the Tactical Map.
Section 6: Operations Map Procedures
You are now ready to fly the route to the target area.
Mission 101 uses Operations Map A and follows this route:
Base → Waypoint 1 → Waypoint 2 → Target Point 6
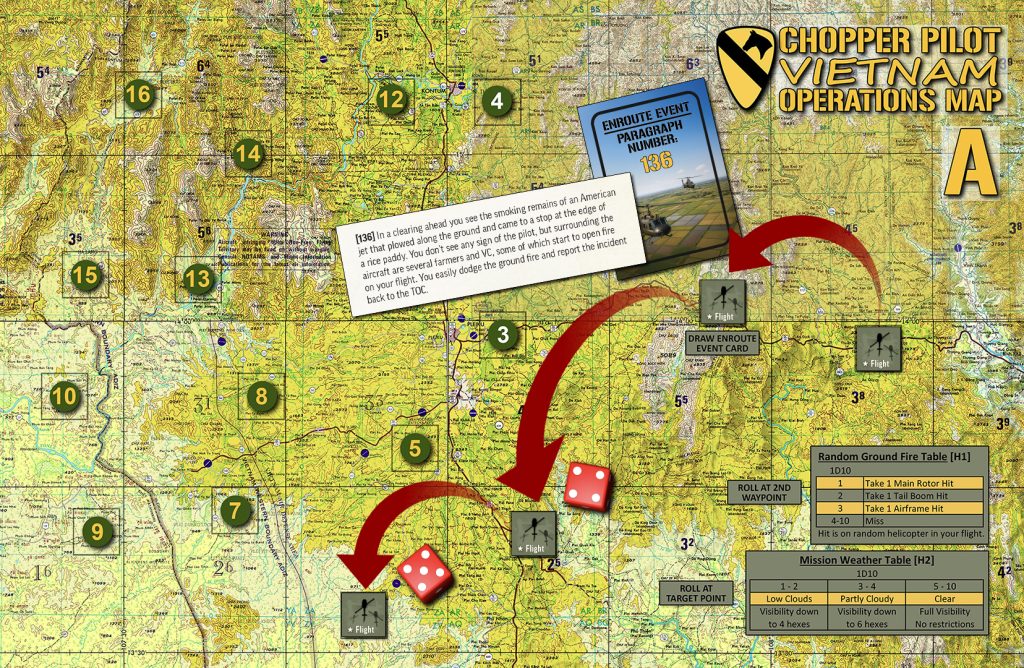
Move the Flight Counter from the Base point to Waypoint 1.
At the first waypoint, draw one Enroute Event Card. For this tutorial, the card directs you to read Paragraph 136.
Paragraph 136:
“In a clearing ahead you see the smoking remains of an American jet that plowed along the ground and came to a stop at the edge of a rice paddy. You don’t see any sign of the pilot, but surrounding the aircraft are several farmers and VC, some of which start to open fire on your flight. You easily dodge the ground fire and report the incident back to the TOC.”
There is no additional effect. Continue the mission.
Next, move the Flight Counter from Waypoint 1 to Waypoint 2.
At the second waypoint, roll on the Random Ground Fire Table H1. For this tutorial, the roll is “4.”
A result of “4–10” is Miss.
Your Huey takes no damage. Continue along the route.
Now move the Flight Counter from Waypoint 2 to Target Point 6.
At the target point, roll on the Mission Weather Table H2. For this tutorial, the roll is “5.”
A result of “5–10” is Clear.
Visibility is full and there are no weather restrictions over the target area.
You have reached the target point safely. Now proceed to the Tactical Map setup.
Teaching Point:
The Operations Map handles the flight to the mission area. At each step, follow the procedure in order: draw the Enroute Event Card at the first waypoint, roll for Random Ground Fire at the second waypoint, and roll for Mission Weather at the target point. Once those steps are complete, the mission shifts to the Tactical Map.
Enroute Event, Random Ground Fire roll, and Mission
Weather roll. Click for larger image.
Section 7: Set Up the Tactical Map
Tutorial Note:
Normally, the Tactical Map Sequence includes a Combat Event Card draw during the Helicopter Phase before helicopter movement.
For all missions, do not draw a Combat Event Card during Tactical Map setup or on Tactical Turn 1. The first Combat Event Card is drawn at the beginning of Tactical Turn 2.
This keeps the first turn focused on entering the map, understanding helicopter movement, checking line of sight, and seeing how the friendly and enemy ground units begin to react.
Teaching Point:
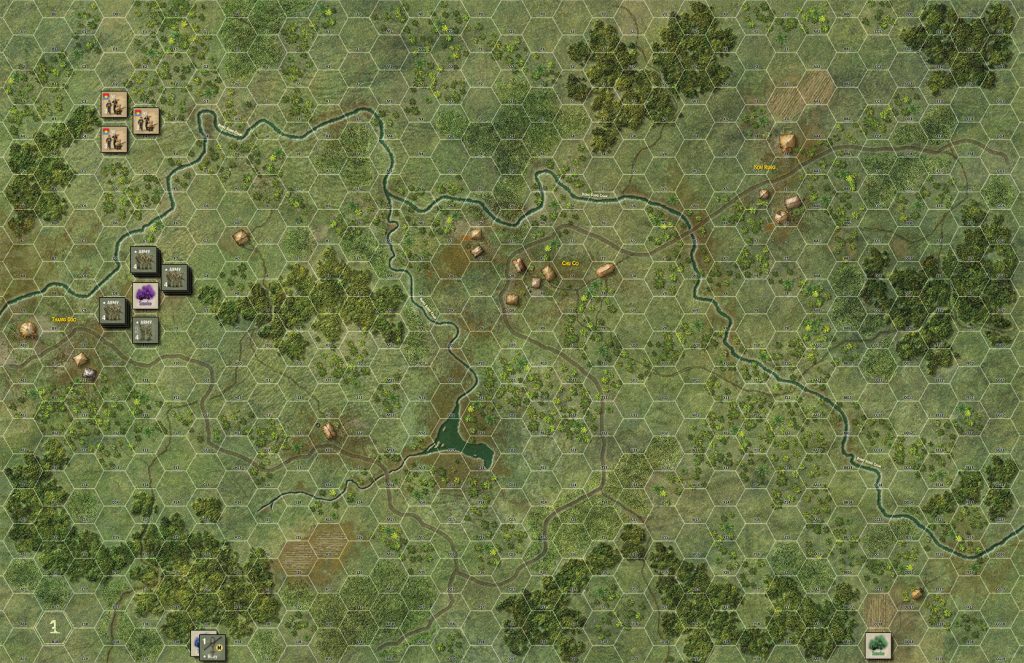
The Mission Briefing controls the Tactical Map setup. Entry hex, LZ hex, exit hex, known enemy units, friendly units, and mission difficulty all come from the briefing.
Section 8: Tactical Turn Sequence
Tactical Turn 1: Helicopter Movement
Now begin the first active Tactical Map turn.
For Tactical Turn 1 only, do not draw a Combat Event Card. The first Combat Event Card will be drawn at the beginning of Tactical Turn 2.
Your Huey enters the Tactical Map at Medium altitude in hex G19, marked by blue smoke.
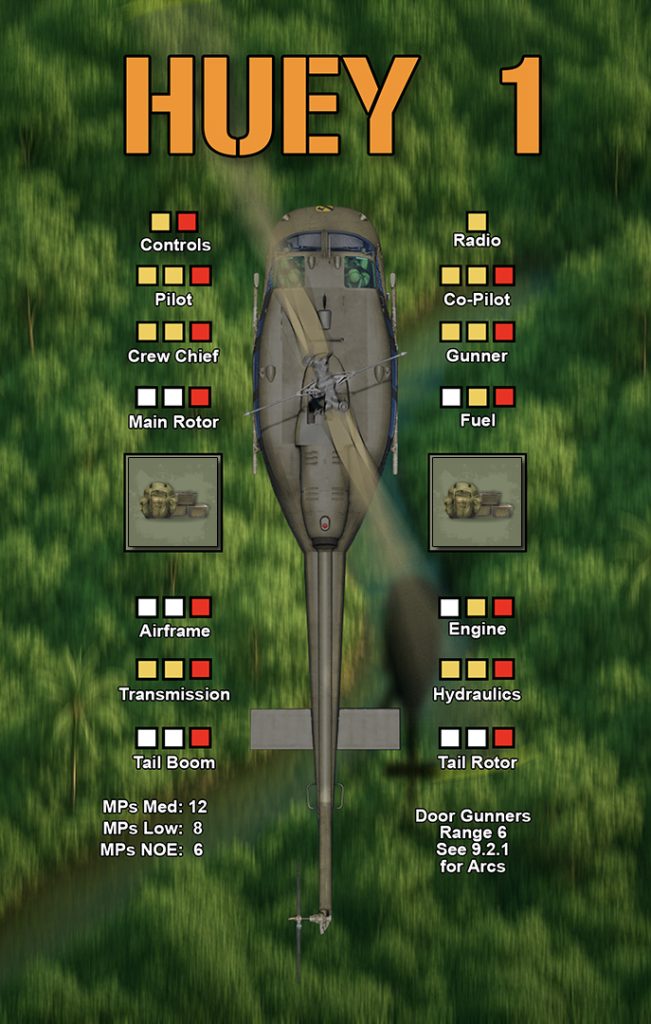
During this first Helicopter Phase, the Huey descends from Medium altitude to Low altitude, costing 1 MP. It then moves straight ahead 7 hexes, ending its movement in hex G12. Movement Points for helicopters are listed on their Helicopter Information Cards, by altitude levels (see image at right).
The Huey has not reached the LZ yet. It is moving into position while the friendly and enemy ground units begin to react.
After the Huey completes its movement, proceed to Initiative Determination.
Teaching Point:
Tactical Turn 1 teaches the basic flow of Tactical Map movement without adding a Combat Event. The Huey enters at Medium altitude, changes altitude, and moves toward the LZ. Combat Events begin on Tactical Turn 2.
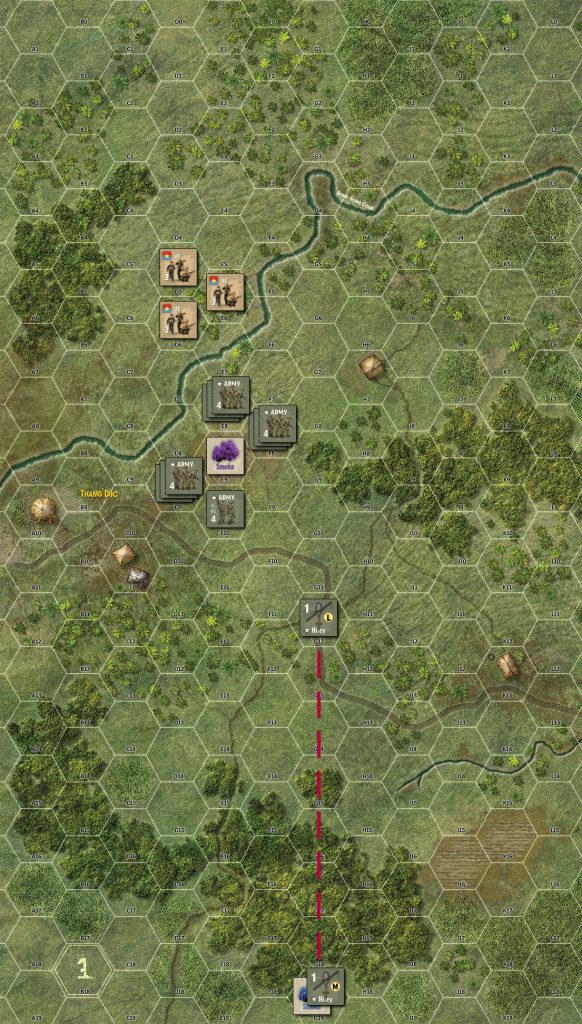
Tactical Turn 1: The Huey enters at G19, descends
from Medium to Low altitude, and moves 7 hexes
toward the LZ. Click for larger image.
Tactical Turn 1: US Ground Initiative and Action
After the Huey completes its movement, draw an Initiative chit.
For this tutorial, the U.S. chit is drawn, so the friendly ground units act first.
Ground units may perform one of three actions:
Move
Shoot
Move & Shoot (at a -1 DRM)
For Tactical Turn 1, all three U.S. squads perform a Shoot action. They do not move, so there is no Move & Shoot penalty.
The U.S. platoon is deployed around the LZ:
1st Squad is in F8.
2nd Squad is in D9.
3rd Squad is in E8.
The U.S. platoon HQ is in E10.
Because light woods does not block line of sight, the U.S. squads can fire at the VC fireteams. However, the VC fireteams are defending in Light Woods, so apply a -1 DRM to each U.S. attack roll.
The player chooses the order of friendly fire.
1st Squad performs a Shoot action against the VC fireteam in E6. The squad uses the U.S. Army vs. Ground Unit card and attacks on the 3–4 range column. Since 1st Squad has three fireteams, it makes three separate attack rolls. The results are two Misses and one Suppressed result. Place a Suppressed marker on the VC fireteam in E6.
3rd Squad performs a Shoot action against the VC fireteam in D5. It also attacks on the 3–4 range column. The three attack results are one Miss, one Suppressed result, and one Damaged result. Flip the VC fireteam in D5 to its damaged side and place a Suppressed marker on top of it.
2nd Squad performs a Shoot action against the VC fireteam in D6. It attacks on the 3–4 range column. All three attack rolls are Misses, so the VC fireteam in D6 is unaffected.
The U.S. platoon HQ does not move or fire this turn.
After each U.S. unit completes its action, mark it with an Actions Over marker.
Teaching Point:
A Shoot action allows a ground unit to fire without the Move & Shoot penalty. Terrain still matters. Light Woods does not block line of sight, but it does protect the defending unit with a -1 DRM against incoming fire.
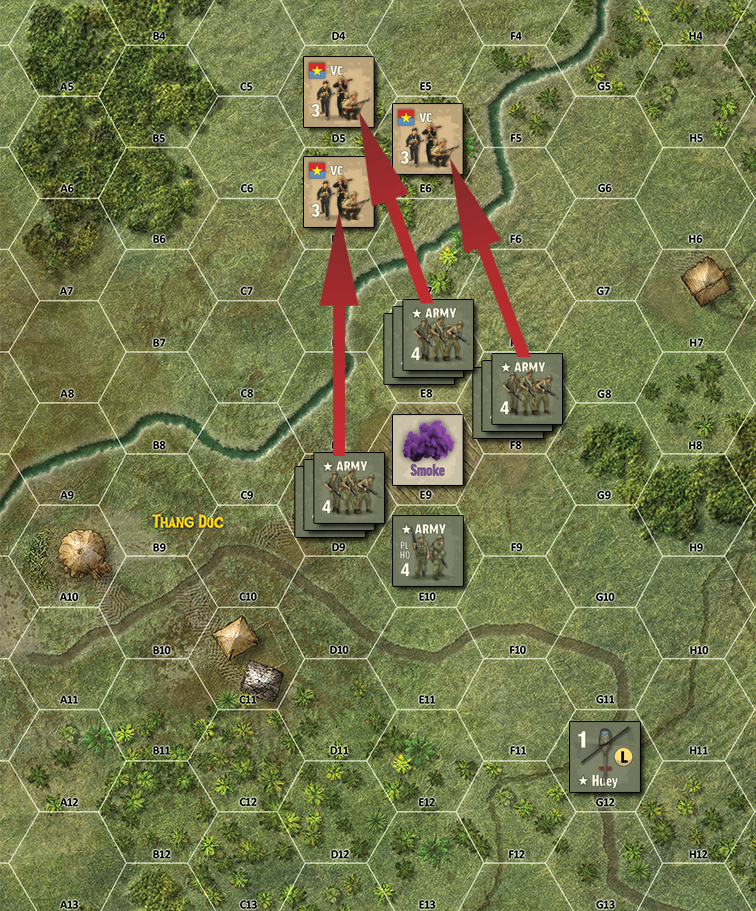
larger image.
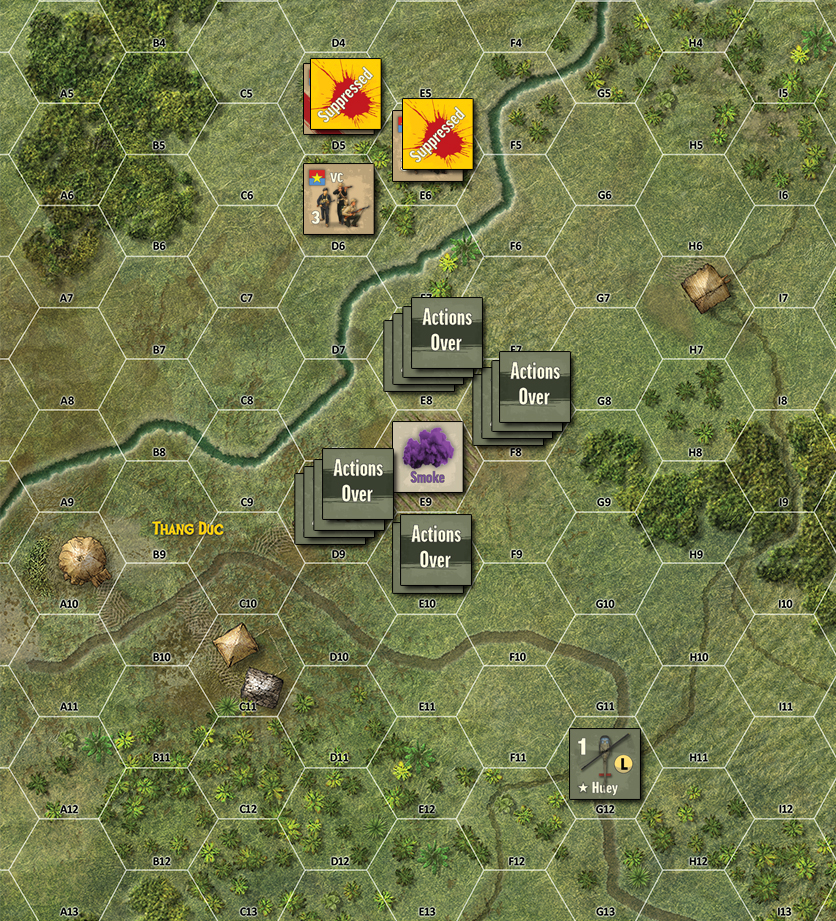
Results of the US attacks. Click for larger image.
Tactical Turn 1: VC Non-Initiative Action and Bookkeeping
After the U.S. units complete their actions, the VC conduct their Non-Initiative Phase.
Two VC fireteams are suppressed:
The VC fireteam in E6 is suppressed.
The VC fireteam in D5 is damaged and suppressed.
Suppressed units cannot move or shoot, so those two VC fireteams take no action this turn.
The VC fireteam in D6 is not suppressed and may act normally.
Consult the Enemy Orders Chart G1. The unsuppressed VC fireteam has a valid target and performs a Shoot action against the topmost U.S. fireteam in 3rd Squad.
The VC fireteam rolls on the 1–2 range column and rolls a “5.”
Result: Destroyed.
Remove the targeted U.S. fireteam (not the whole squad) from the map.
After both sides have completed their ground actions, proceed to the Bookkeeping Phase.
During the Bookkeeping Phase, roll for suppression removal.
The VC fireteam in E6 fails its Morale roll and remains suppressed.
The damaged VC fireteam in D5 also fails its Morale roll and remains suppressed.
After removing all “Actions Over” markers, Tactical Turn 1 is now complete.
Teaching Point:
Suppressed units do not get to move or shoot, but suppression removal is not checked until the Bookkeeping Phase at the end of the turn. Any suppressed unit that fails its Morale roll remains suppressed going into the next Tactical Turn.
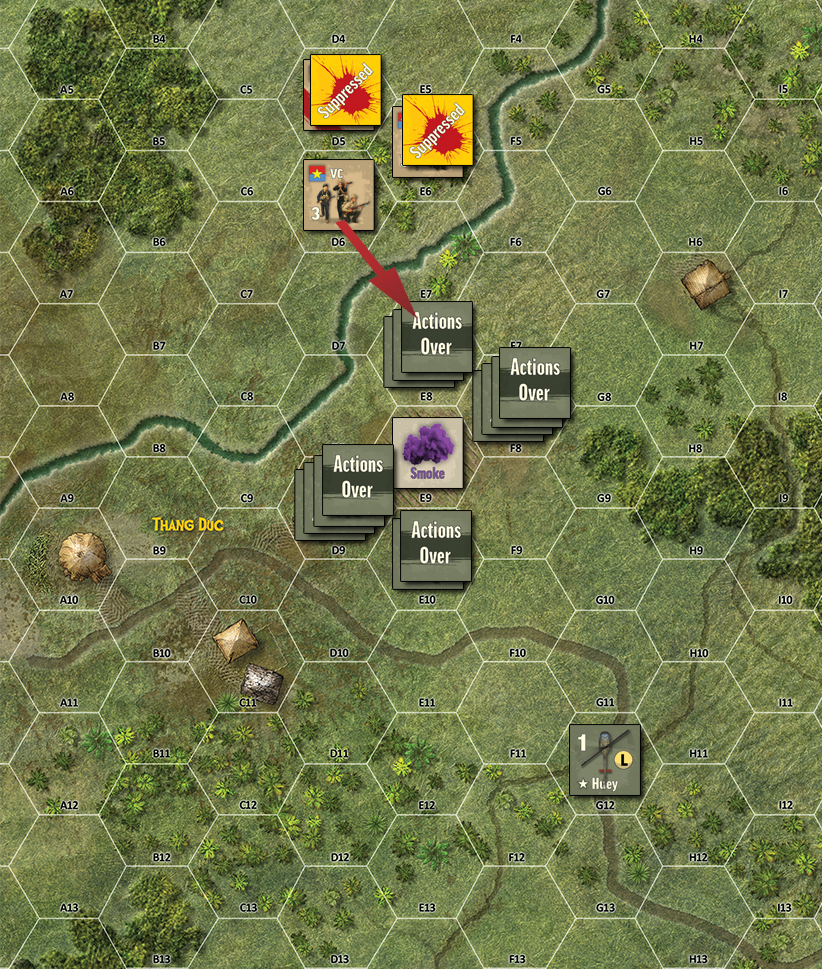
3rd Squad and destroys one U.S. fireteam. The other two VC fireteams
fail their Morale rolls and remain suppressed. Click for larger image.
Tactical Turn 2: Combat Event and Helicopter Movement
Begin Tactical Turn 2 with the Helicopter Phase.
This is the first Tactical Turn in which you draw a Combat Event Card. For this tutorial, the Combat Event Card directs you to Paragraph 235.
Paragraph 235:
“A random friendly ground unit has encountered a booby-trap. They only have 3 MPs per turn for the remainder of the mission. If no friendly units are on the map, then there is no event.”
There are friendly ground units on the map, so the event applies.
Randomly determine which friendly unit triggered the booby-trap. In this tutorial, the selected unit is the U.S. platoon HQ. For the rest of the mission, the platoon HQ has only 3 MPs per turn.
After resolving Paragraph 235, place this Combat Event Card in a discard pile.
Now move your Huey.
The Huey begins the turn at Low altitude. It moves forward 2 hexes, descends one level to Nap of the Earth altitude, turns left one hexside, and then moves forward 1 more hex.
This costs 5 MPs total:
2 MPs to move forward 2 hexes
1 MP to descend from Low to Nap of the Earth
1 MP to turn left one hexside
1 MP to move forward 1 hex
The Huey ends its movement closer to the LZ and is now flying at Nap of the Earth altitude.
Teaching Point:
Combat Event Cards begin on Tactical Turn 2. Resolve the Combat Event before helicopter movement. Some events affect the helicopter directly, while others affect friendly or enemy ground units already on the Tactical Map. Discard all Event Cards after use and only reshuffle the deck when it is exhausted.
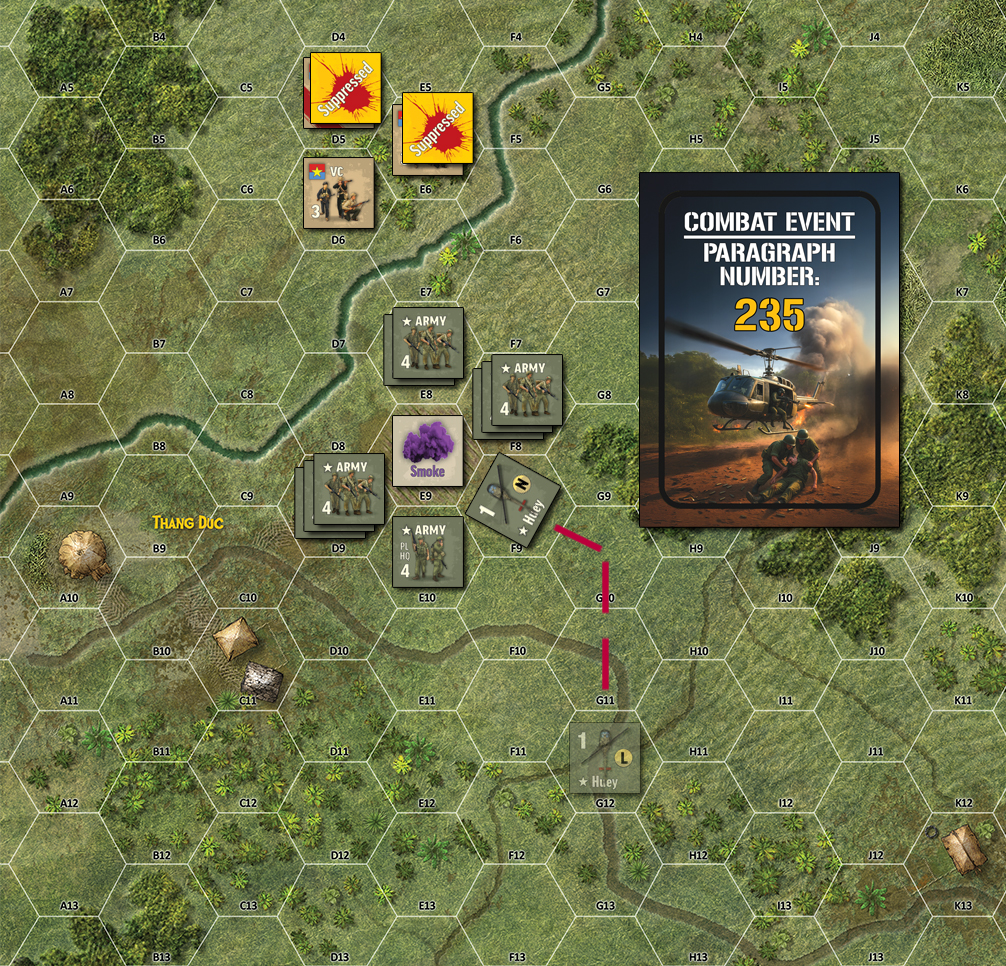
Tactical Turn 3: Combat Event, Spotting, and Landing
Begin the next Tactical Turn with the Helicopter Phase.
Draw one Combat Event Card before moving the Huey.
For this tutorial, the Combat Event Card shows Direction 1 and Distance 10.
Roll on the Enemy Spawn Table E2 using the Green column. The roll is “10,” which places a VC HMG team.
The indicated spawn location would be 10 hexes away in Direction 1 from the Huey. Since that would place the unit off the Tactical Map, place the VC HMG team in the nearest map-edge hex.
The spawned VC HMG team is initially unspotted.
Before moving, the Huey attempts to spot the new enemy unit. Roll on the Spotting Table E3. For this tutorial, the Huey rolls a “5,” which successfully spots the VC HMG team. Remove the Unspotted marker.
Now move the Huey into the LZ.
The Huey moves forward 1 hex, descends to ground level, and lands in the LZ. It then spends 1 MP to unload the supplies.
This costs 3 MPs total:
1 MP to move forward
1 MP to descend to ground level (land)
1 MP to unload supplies
The supplies are now delivered, so the main mission task is complete. The Huey is on the ground in the LZ, but the mission is not over until it exits the Tactical Map and returns safely to base.
Teaching Point:
Spawned enemy units begin unspotted. Before a helicopter can attack a newly spawned enemy unit, it must first spot the target using the Spotting Table E3. Also remember that landing at the LZ is not enough for a resupply mission. The helicopter must spend 1 MP to unload the supplies.
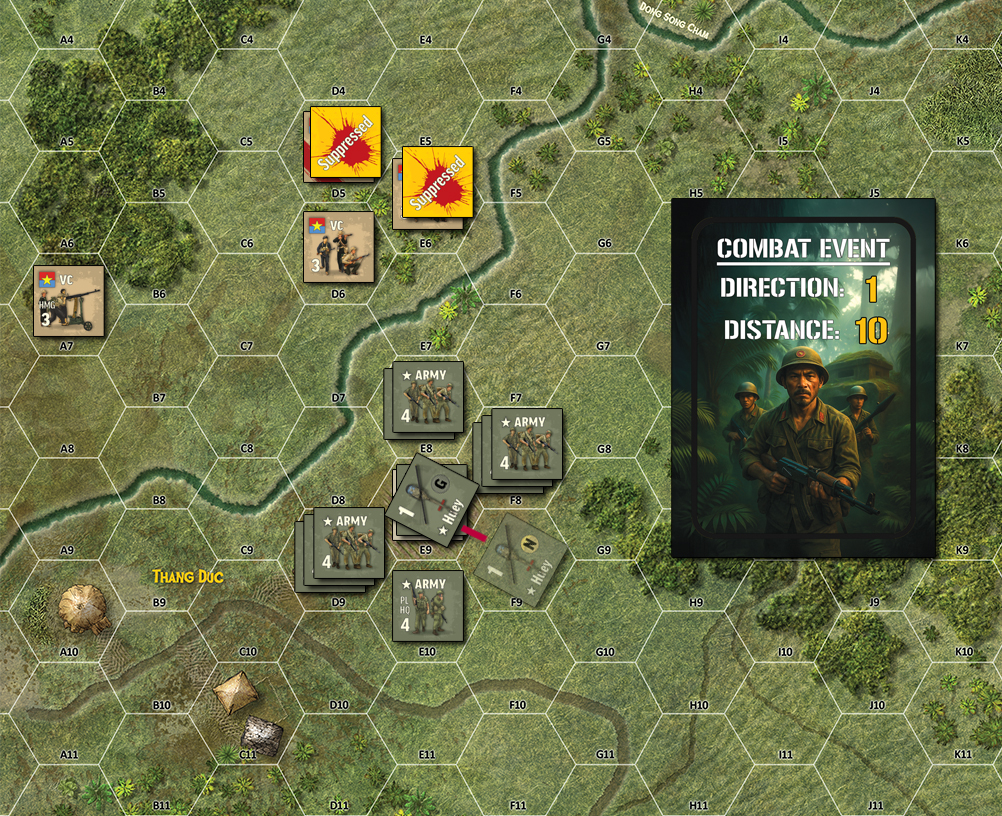
then lands in the LZ and unloads supplies.. Click for larger image.
Tactical Turn 3: VC Initiative and Ground Fire vs. Helicopter
After the Huey lands and unloads supplies, draw an Initiative chit.
For this tutorial, the VC chit is drawn, so the VC ground units act first.
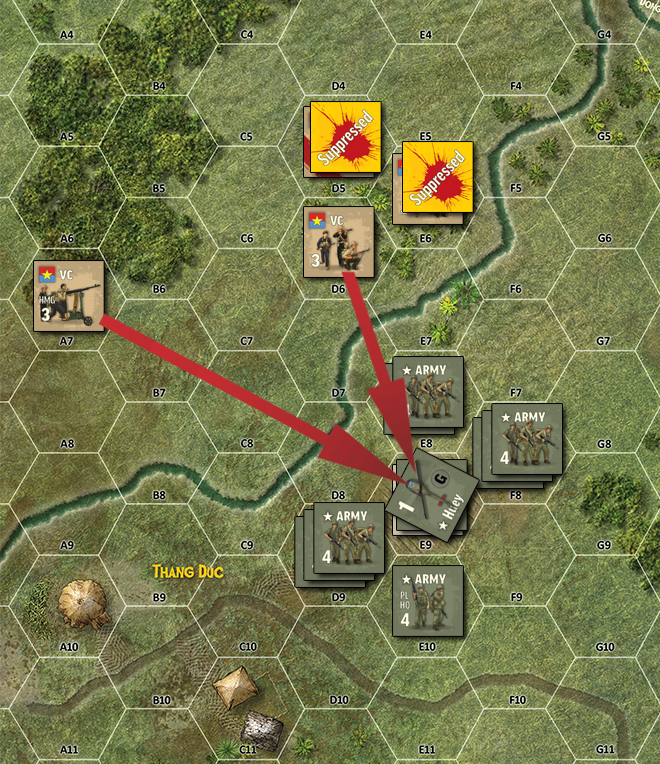
The newly spawned VC HMG team is 4 hexes away from the Huey. Consult the Enemy Orders Chart G1. The HMG has a “Shoot” order.
Because the Huey is within range and there is a clear line of sight, the Huey becomes the priority target.
The VC HMG team rolls a “3,” which is a Hit.
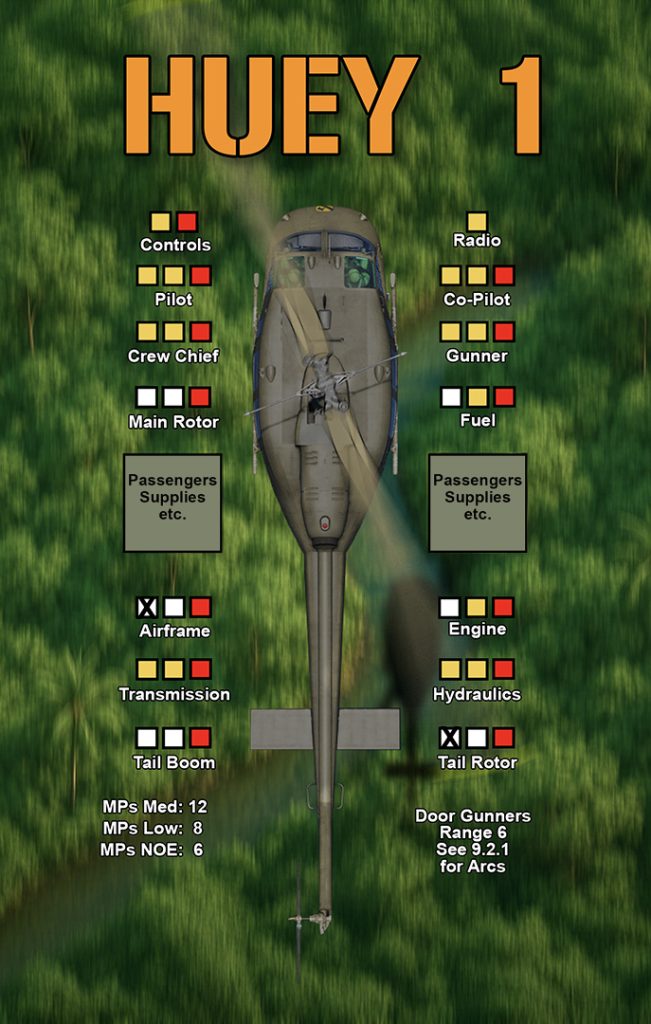
An HMG hit rolls twice on the Helicopter Damage Table C1.
The two damage rolls are:
64: Tail Rotor hit
15: Airframe hit
Mark off the first damage box under Tail Rotor and the first damage box under Airframe on the Huey Helicopter Info Card.
Now check the Helicopter Damage Effects Chart C2. At this damage level, there is no additional effect. The Huey is damaged but still operational.
The VC fireteam in D6 also has a Shoot order. The Huey is its priority target.
The VC fireteam rolls a “6,” which is a Hit.
Now roll once on the Helicopter Damage Table C1.
The damage roll is “34” a Rockets hit.
Because this is a Huey, the Rockets result has no effect. Treat it as a miss against this aircraft.
The other two VC fireteams are suppressed and cannot move or shoot this turn.
Teaching Point:
When a helicopter is within range, enemy ground units will make it the priority target. HMG teams are especially dangerous because each hit causes two rolls on the Helicopter Damage Table. Always mark damage immediately, then check the Helicopter Damage Effects Chart to see if the aircraft suffers any additional restriction.
Tactical Turn 3: US Non-Initiative Combat
After the VC complete their Shoot actions, the U.S. ground units conduct the Non-Initiative Phase.
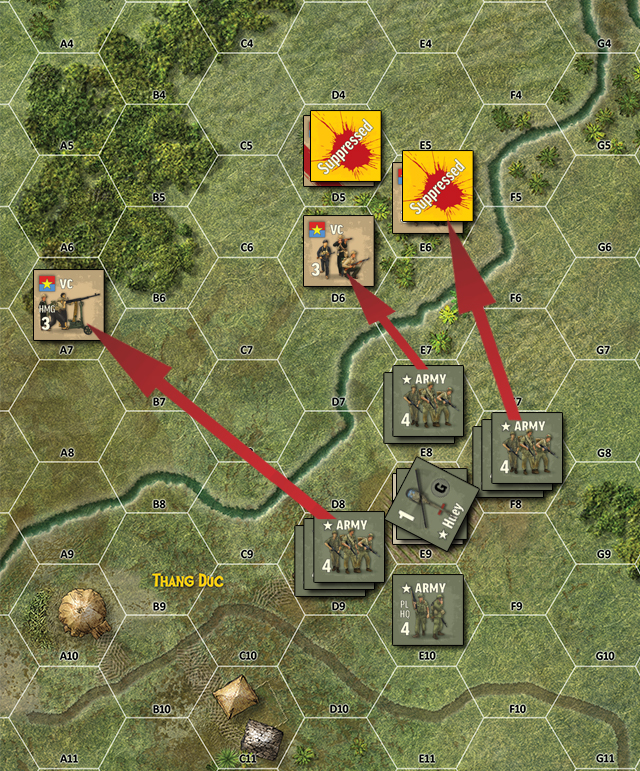
The U.S. squads perform Shoot actions. They do not move, so there is no Move & Shoot penalty.
2nd Squad fires from D9 at the VC HMG team in A7.
The VC HMG team is in Jungle, so apply a -1 DRM to the U.S. attack rolls.
2nd Squad has three fireteams, so it makes three separate attacks. One fireteam rolls a “3.” After the -1 Jungle DRM, the result is Suppressed. Place a Suppressed marker on the VC HMG team. The other two fireteams miss.
3rd Squad fires from E8 at the VC fireteam in D6.
The VC fireteam is in Light Woods, so apply a -1 DRM to the U.S. attack rolls.
3rd Squad has two remaining fireteams. One fireteam rolls a “2.” After the -1 Light Woods DRM, the result is Suppressed. Place a Suppressed marker on the VC fireteam in D6. The other fireteam misses.
1st Squad fires from F8 at the suppressed VC fireteam in E6.
The VC fireteam is in Light Woods, so apply a -1 DRM to the U.S. attack rolls.
1st Squad has three fireteams, so it makes three separate attacks. The rolls are “4,” “5,” and “1.” After applying the -1 Light Woods DRM, the final results are two Damaged results and one Miss.
The first Damaged result flips the VC fireteam to its damaged side. The second Damaged result destroys it. Remove the VC fireteam in E6 from the map, along with its Suppressed marker.
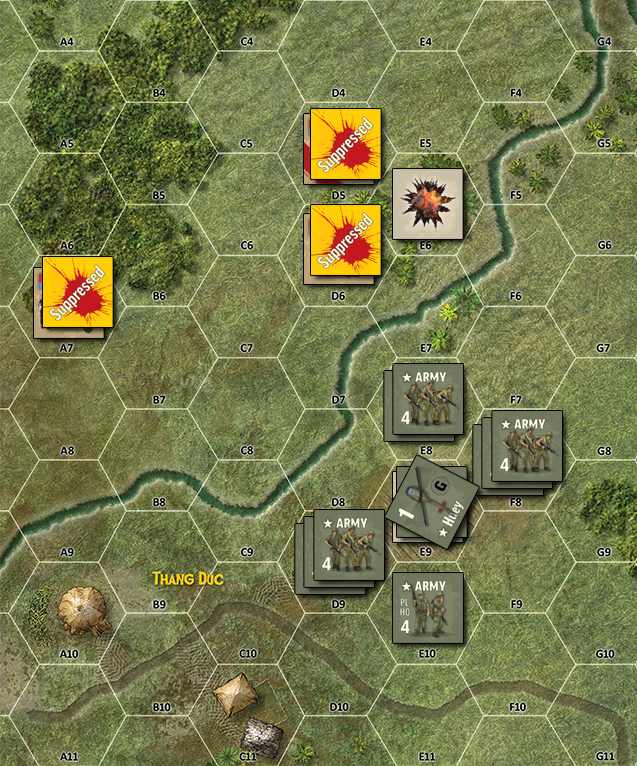
At the end of the U.S. Non-Initiative Phase, the VC HMG team in A7 is suppressed, the VC fireteam in D6 is suppressed, the VC fireteam in D5 remains damaged and suppressed, and the VC fireteam in E6 has been destroyed.
After both sides have completed their ground actions, proceed to the Bookkeeping Phase.
During the Bookkeeping Phase, roll for suppression removal.
Each suppressed VC unit rolls 1D6 and must roll its Morale number or less to remove suppression.
For this tutorial, all suppressed VC units fail their Morale rolls.
The Suppressed markers remain in place on:
The VC HMG team in A7.
The damaged VC fireteam in D5.
The VC fireteam in D6.
These units will remain suppressed going into the next Tactical Turn and cannot move or shoot unless they remove suppression during a later Bookkeeping Phase.
Tactical Turn 3 is now complete.
Teaching Points:
A Shoot action allows a ground unit to fire without the Move & Shoot penalty. However, terrain DRMs still apply. Jungle and Light Woods both protect the defender by making incoming fire less effective. Multiple fireteams firing at the same target can stack up results quickly: one Damaged result flips a ground unit, while a second Damaged result destroys it.
Suppression can buy time. A suppressed enemy unit cannot move or shoot, but it is not destroyed. If it fails its Morale roll during the Bookkeeping Phase, the Suppressed marker stays in place and the unit remains ineffective going into the next turn.
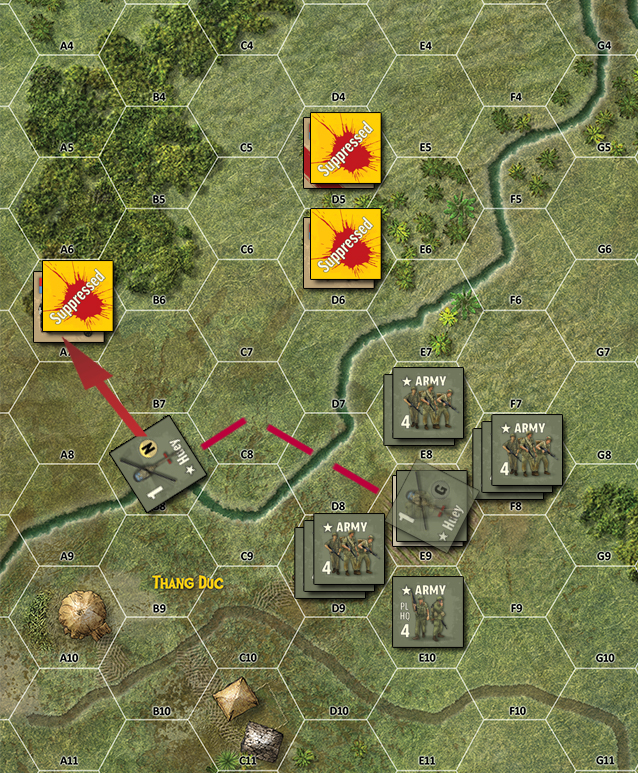
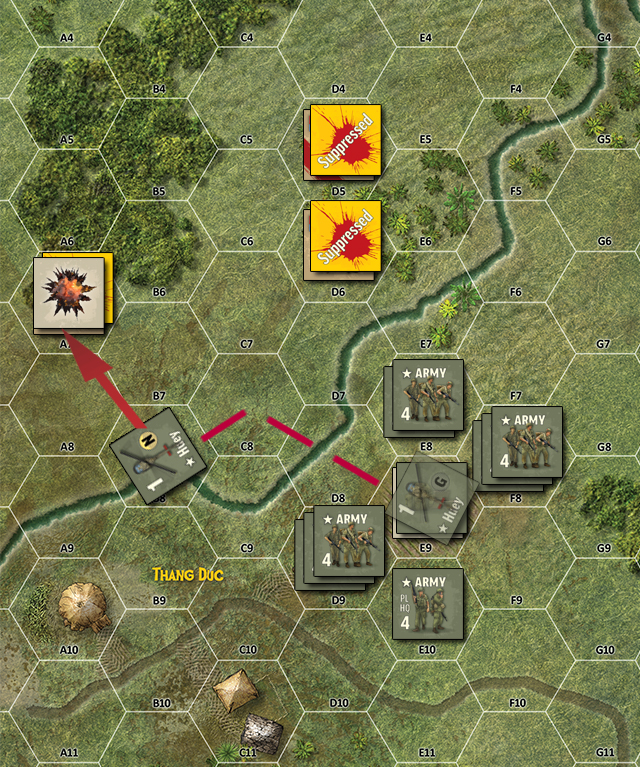
Tactical Turn 4: Take Off and Door Gunner Attack
Begin Tactical Turn 4 with the Helicopter Phase.
Draw one Combat Event Card before moving the Huey.
For this tutorial, the card result is “No Event.” There is no new enemy spawn and no paragraph to resolve. Place the card in the discard pile.
Now move the Huey.
The Huey takes off from the LZ and climbs to Nap of the Earth altitude, costing 1 MP.
It then moves forward 2 hexes, costing 2 MPs.
The Huey turns left one hexside, costing 1 MP.
It then moves forward 1 more hex, costing 1 MP.
The Huey has spent 5 MPs total this turn.
During this movement, the door gunner fires at the spotted VC HMG team.
The VC HMG team is in Jungle, so apply a -1 DRM to the attack roll.
Roll on the Machinegun/Strafing Attack Table B2. The door gunner rolls a “6.” After the -1 Jungle DRM, the modified result is a “5.”
Result: Destroyed.
Remove the VC HMG team from the map.
Teaching Point:
A “No Event” card means exactly that: nothing new happens before movement. The helicopter still completes its Helicopter Phase normally. Door gunners may fire during helicopter movement if the target is spotted, within range, and inside the firing arc. Terrain DRMs still apply.
Section 9: Return to the Operations Map
In the interest of time we will presume that your Huey has exited the Tactical Map at the required Exit Hex, CC19. The Tactical Map portion of Mission 101 is complete.
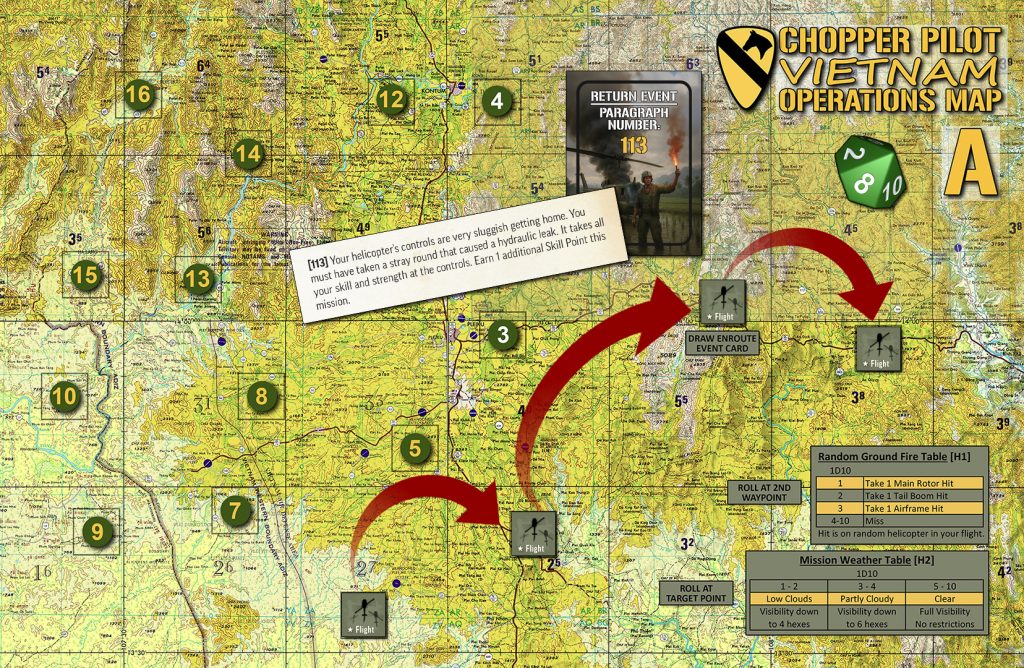
Return to Operations Map A and begin the flight back to base.
Retrace the route back along the same waypoints used to reach the target area:
Target Point 6 → Waypoint 2 → Waypoint 1 → Base
At the first return waypoint, draw one Return Event Card.
For this tutorial, the Return Event Card directs you to Paragraph 113.
Paragraph 113:
“Your helicopter’s controls are very sluggish getting home. You must have taken a stray round that caused a hydraulic leak. It takes all your skill and strength at the controls. Earn 1 additional Skill Point this mission.”
Your Huey makes it home, but the flight back is not routine. The Main Rotor hit from the Tactical Map was not the only problem. A stray round also caused a hydraulic leak, making the helicopter harder to control on the return flight.
Award 1 additional Skill Point for handling the emergency and bringing the aircraft home.
Now roll on the Weather Landing Table F3.
For this tutorial, the roll is “8.”
The weather is clear and the Huey lands safely at base.
Mission 101 is now complete.
Teaching Point:
The mission is not over when you leave the Tactical Map. You still have to return to base, resolve a Return Event Card, and make the Weather Landing roll. Chopper Pilot Vietnam keeps pressure on the player until the helicopter is safely back on the ground.
Section 10: Complete the Mission Log
Mission 101 is complete. Now update the Mission Log.
Record the mission result:
- Mission Completed: 1
- Skill Points Earned: 2
- Skill Points Total: 2
- Victory Points Earned: 5
- Victory Points Total: 5
Mission 101 normally awards 1 Skill Point for successful completion. You also earned 1 additional Skill Point from Return Event Paragraph 113, for a total of 2 Skill Points.
The player decides how to assign the 2 Skill Points earned this mission. Skill Points are accumulated by crew member and may be spent between missions to improve skills such as Flying Ability, Perception, or Gunnery. Improved skill levels provide positive DRMs when that crew member performs relevant actions.
Now check Victory Points.
You earn all 5 Victory Points:
- Mission accomplished: Yes
- No helicopters shot down: Yes
- No crew wounded: Yes
- No crew killed: Yes
- No villagers killed: Yes
Finally, write a short note summarizing what happened during the mission. For this tutorial example:
“Successfully delivered supplies to troops in the field. Sustained minor main rotor damage. Rizzo destroyed an enemy HMG team upon return.”
Teaching Point:
Post-mission record keeping matters. The Mission Log is where the campaign becomes persistent. Damage, crew performance, Skill Points, Victory Points, and mission history all carry the story forward.
This completes the Mission 101 walkthrough.